Network Adapter Not Working – How to Fix it

Are you facing limited internet connectivity or no internet access problems? Such issues usually appeared due to deteriorated, outdated, or incompatible network adapters.
What is a Network Adapter?
It’s a network interface card integrated into the PC which lets a computer connect to a network. This network interface card is usually built into the computer, which can be connected to the internet via Ethernet or Wi-Fi.
A network adapter simply allows your PC to connect to the Internet. However, if the network adapter drivers are outdated or show some errors, there might be problems with the network connection. Despite this, the network drivers also become incompatible with new updates, which further starts showing network connection issues, such as limited internet connectivity, etc.
So, how to fix Network Adapter?
The following guide will help you in troubleshooting network adapter problems. We here mention in detail what you have to do every time you start experiencing network-related issues.
Fixing a Network Adapter in Windows 10 – Introduction
If you find that your network adapter stops working (No Internet access) after you wake up your computer from Sleep Mode, then this post will show you how to fix the issue. You can reset the network adapter and see if it fixes the problem.
In the past, if you found that your network adapter was not working properly and would no longer connect to the internet, you would uninstall it in Device Manager, reboot your computer, and Windows 10 would automatically reinstall it.
However, with Windows 10 Creators Update, Microsoft has changed this behavior for certain types of hardware and drivers which now use a new feature called “inbox component staging” where Windows keeps an extra copy of drivers as a backup.
If a device is uninstalled or fails to install properly,Windows will use this backup copy to replace the missing or bad driver with a known good one. This ensures that your devices will always be reinstalled correctly even if they were removed on purpose or by accident. However, if something is wrong with the driver itself or its configuration files, then this method won’t work anymore.
What To Look At For Fixing the Network Adapter Issues?
An appropriate network adapter is necessary for windows to stay connected to the Internet. But, problems with such devices result in poor internet connection or no internet connectivity at all.
So, in order to get a stable internet connection, you must know how to fix the network adapter problem on your own.
Check All Physical Connections
The first and foremost thing to fix network adapter issues is to check all physical connections. So, ensure all the network cables/optical cables and network cables are properly attached to ports. Nothing should be unplugged or loose. For more reliable connectivity, you can remove and then insert the card.
Disable and Enable Your Network Adapter
Another solution to fix the network adapter problem is to disable and enable the network. Here are the following steps for this:
- Open “Control Panel” and click on “Network and Internet>View Network Status and Tasks“
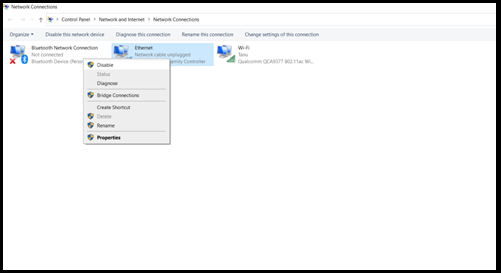
- Now, click on the “Change Adapter Settings” and you’ll see all the available internet connectivity options.
- Right-click on the active connection and select “Disable“.
- Now, right-click on the same network again and select “Enable“.
How to Reset Network Adapters in Windows 10
If you are facing any network adapter problem in Windows 10, try to reset network adapters.
You can only reset network adapters if you’re connected to the internet. If you do not have an active internet connection, then you can also use Command Prompt to reset network adapters.
Method 1: Reset Network Adapters in Windows 10 using Device Manager
Using Device Manager is the easiest way to reset network adapters on Windows 10 machines. To open Device Manager, click on Start and select Run. Type ‘devmgmt.msc’ and hit Enter or click OK.
Once you are inside the Device Manager, expand the Network Adapters section and right-click on your active Ethernet or Wireless connection and select Properties. Click on Configure… button and switch to Advanced tab. From there, look for a setting called ‘Network Address’ and double-click on it or right-click and select Modify option.
Method 2: Reset Network Adapters in Windows 10 using Command Prompt
Resetting network adapters in Windows 10 is really easy. Here’s how you can do it.
1. Press Win + X and select Command Prompt (Admin).
2. Click Yes on the User Account Control dialog box.
3. Type netsh winsock reset in the command prompt window and hit Enter .
4. Type netsh int ip reset in the Command Prompt window and hit Enter.
5. Restart your PC to save changes and see if you’re able to Fix Network Adapter Missing on Windows 10
Determine Network Adapter Status
Now, check the status of your network adapter through Device Manager to verify whether the network card is identified by your computer or not. If not, here are the following steps:
- Press Win+R from the keyboard to open a Run box.
- Type “devmgmt.msc” in the box and click “OK“. It’ll lead to the Device Manager window.
- Now, choose the “Network Adapters” option in Device Manager to expand this section. It’ll either show one or more network adapter options. Double-click any of these. This will further show network card status on the “General” tab.
- If it shows “This device is working properly“, it means that the network card is still working. Otherwise, there might be some specific problems with your card.

Look for Resource Conflicts in the Operating System
Ensure that there are no resource conflicts between the Network Interface Card (NIC) and other system components. In order to determine, here are the following steps:
- When you boot, press F1 to enter the Setup/Configuration Utility.
- Now, check Advanced Setup/PCI Slot/Device Information (or PCI Bus Control) to select the slot to be changed.
- Free up resources by disabling unused devices (serial ports, parallel ports, etc.).
Also Read: How To Fix/Disable Driver Signature Enforcement Windows 10
While fixing the network adapter issues, make sure all protocols and network hardware are set appropriately, including cables, hubs, switches, and many others. In spite of this, ensure that every IP address is unique and Dynamic Host Configuration Protocol (DHCP) is also configured properly to obtain a TCP/IP address automatically.
Troubleshooting Network Adapter
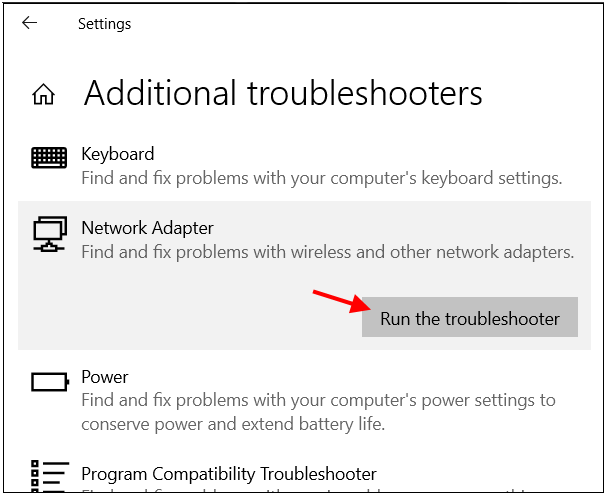
A network adapter troubleshooter is also an effective option to fix the issues related to network connectivity. Here are the following steps:
- Press Windows Key + I to open “Settings” and click on “Update & Security“.
- Now, choose “Troubleshoot” from the left-hand menu.
- And then, select “Internet Connections>Run the Troubleshooter“. And, follow the recommended on-screen instructions to run the troubleshooter.
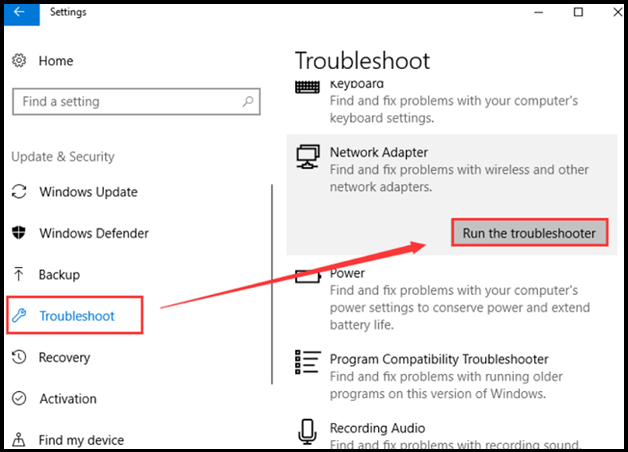
- If it fails to fix the issue, click on “Network Adapter>Run the troubleshooter“.
- Restart your PC to save changes.
Reset Network Connections
The other option to fix issues related to network adapters is to reset your network connections. Here are the following steps for this:
- Press Windows Key + I to open “Settings and click on “Network & Internet“.
- Now, select “Status” from the left-hand menu.
- At the bottom, choose “Network reset“.
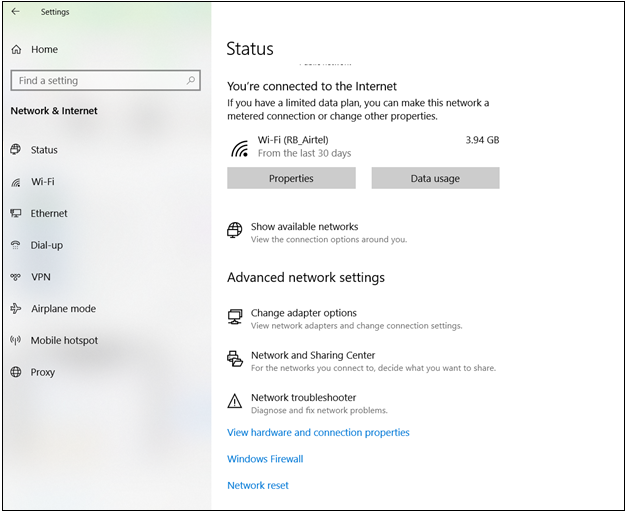
- Click “Reset now” under the “Network reset” section.
- In the end, you become successful in resetting your network adapter. For saving changes, restart your PC.
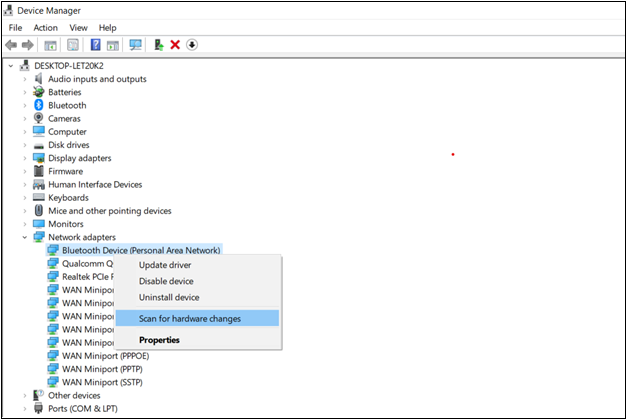
Scan For Hardware Changes
If you have updated your drivers, disabled and enabled, uninstalled and installed your network adapter, or disabled and enabled it, the first step is to scan for hardware changes. By doing so, you ensure that the device is up-to-date and functioning properly. Open your Device Manager through the RUN box.
Now, right-click on the appropriate network adapter under the Network Adapters section. Select “Scan for hardware changes” to update all the changes made to the network adapter.
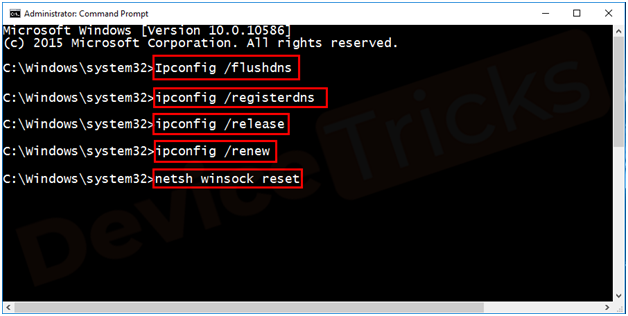
Perform Winsock Reset
If you’re having trouble viewing web pages, despite having a stable network connection, you may need to reset Winsock. Here are the following steps:
- Press “Windows+X” to show the menu and select “Command Prompt (Admin)” in it.
- Click on “Yes” in the User Account Control window.
- Now, type the following commands and hit “Enter” after each one.
ipconfig /release
ipconfig /flushdns
ipconfig /renew
- Again, open Command Prompt and type the following commands and press “Enter” after each one.
ipconfig /flushdns
nbtstat –r
netsh int ip reset
netsh winsock reset
- Further, restart the PC to save changes. This will fix the network adapter driver issue if there is any.
Examine The LED Indicators of Your Network Cards
Whenever the link LEDs fail to light, it means that the physical connection is unavailable to the network. There could be a problem with either the network devices or the network itself. You can first test the ports or slots by inserting cables or adapters in different ports or slots. In case the problem persists and you have extra cables and NICs, you can use those extra cables or cards to determine if the cables and NICs are damaged.
Alternatively, you can install the card on another computer or server if you do not have a new NIC or cable. If it doesn’t resolve the issue, you will need to check the compatibility of cables and network devices connected with your adapter to see whether their data rate, port type, and brand are the same.
Also Read: List of Windows 10 Blue Screen Error & Stop Codes (BSoD)
Reinstall Network Adapter Drivers
There might be a problem with network adapter drivers. You can resolve it by reinstalling these drivers. for this:
- Press Win+R for quick access to the RUN box.
- In the box, type “devmgmt.msc” and click “OK” to open Device Manager.
- After entering into Device Manager, expand the Network Adapters section in Device Manager. Now, right-click on the network adapter’s name and choose Uninstall.
- To confirm uninstallation, click “OK.”. After this, the driver will be rebooted to reinstall.
Update the Network Drivers
One of the common causes of Network Adapter Driver problems is outdated drivers. To fix this problem, download the latest drivers for your network card. In addition, changing your Windows to a newer version is one of the most likely causes of this problem. To ensure your drivers are up to date, use manufacturer update apps like HP Support Assistant.
- Press Windows key + R to open the Run box
- Now, type “devmgmt.msc” in the box to open Device Manager.
- Now, expand Network adapters.
- Right-click on any network adapter’s name and choose “Update Drivers”.
- Once you enter the Update Driver Software Windows, tab on “Browse my computer for driver software.“
- After this, choose “Let me pick from a list of device drivers on my computer” and select “Next“.
- And, restart your PC to apply changes.
Make sure you’re updating drivers from the listed versions. If the above instructions aren’t working, visit your manufacturer’s website to update drivers.
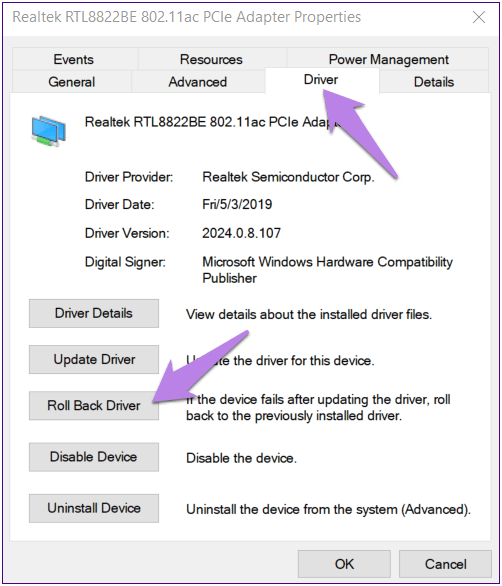
Roll Back to Previous Network Adapter Driver
If the updated version of a driver isn’t working or showing any error, you can roll back a driver. It uninstalls the current driver and re-installs the previous version. Here are the following steps:
- Press Windows Key + R from keyboards.
- Now, input “devmgmt.msc” in the Run box and hit “Enter” to enter into Device Manager.
- In Device Manager, expand “Network Adapter“.
- Right-click on any network adapter’s name and select Properties.
- Click to the “Driver” tab and select “Roll Back Driver“.
- Continue by selecting “Yes/OK” to roll back the driver.
- Once the rollback is complete, restart your PC.
Temporarily Disable Antivirus and Firewall
Another main cause of Network Adapter issues in Antivirus programs. To fix this, you need to disable this program for a while and check whether the issue is still appearing or not. Here are the following steps to do this:
- To disable the Antivirus Program, right-click on the icon in the system tray and select “Disable“.
- Next, choose the timeframe for which you wish to disable the Antivirus. Make sure you’re selecting the smallest amount of time, for example, 15 minutes/30 minutes.
- Now, try to connect the network adapter to determine whether the error resolves or not.
- Open “Control Panel” and click on “System and Security“.
- Now, select “Windows Firewall“.
- Click on “Turn Windows Firewall on or off” from the left-hand window panel.
- Choose “Turn off Windows Firewall and restart your PC“.
- Now, try to connect with the network and check if you’re able to fix Network Adapter Driver issues.
Make Sure TCP/IP is Properly Installed
In case, if none of the above-mentioned isn’t working or not fixing the issue, it’s time to check whether the TCP/IP is properly installed or not.
- Right-click the “My Network” icon and select “Properties“. The network card should be listed as a local area connection.
- Now, right-click the appropriate “Local Area Connection” and click on “Properties“. Ensure that the Internet Protocol (TCP/IP) is installed.
- If TCP/IP isn’t installed, click “Install>Protocol>TCP/IP“.
- Ensure both Obtain an IP address automatically and Obtain DNS server address automatically are checked once the software is installed (if you’re using DHCP).
- To verify this, select “Properties” on the TCP/IP protocol.
Reset TCP/IP
If the above-mentioned methods aren’t fixing the issue, you will have to reset the TCP/IP stack. You may be unable to access the Internet because of a corrupted Internet Protocol or TCP/IP. You can use the command prompt to reset TCP/IP or use a Microsoft utility directly.
- In the search box on the taskbar, type “Command Prompt“.
- Right-click on “Command Prompt” and select “Run as administrator>Yes“.
- In the command prompt, type the following commands in the listed order.
Input “netsh winsock reset” and press Enter.
Input “netsh int ip reset” and press Enter.
Input “ipconfig /release” and press Enter.
Input “ipconfig /renew” and press Enter.
Input “ipconfig /flushdns” and press Enter.
- Restart your PC.
Download Network Adapter Driver for Windows 10
Welcome to the driver download section of Fixbit driver updater tool. Here you can download Windows 10 network adapter drivers for the latest hardware. If you need drivers for the current version of Windows, it can be downloaded from the official website.
Latest network adapter drivers for window 10 free download in here:
![]()
We hope that the information above has been helpful to you. If you have any questions about how to fix network adapter problems in Windows 10.
Also Read: How To Install Unsigned Drivers In Windows 10 [FIXED]
How to use this download
Download the self-extracting archive and run it. It will extract the files to a temporary directory, run the installation wizard, and remove the temporary files when the installation is complete.
All language files are embedded in this archive. You do not need to download an extra language pack.
Let’s Summarize!
Network problems can knock on the door at any time. That’s why it’s necessary to gather some basic knowledge about how to fix network-related problems.
We hope that our above-mentioned steps are able to resolve the network adapter issues on windows. However, if you’re still unable to find any solution regarding this issue, you can contact us or contact a professional.