USB Headset not Working on Windows 10
USB Headset not Working on Windows 10

Whether you are a music lover, movie buff, or an avid gamer, having a good USB headset does enhance the overall experience. But what if your USB headset starts giving you trouble? Relax, you don’t need to be a worried stick, let us give you the rundown of how this issue can be easily fixed in Windows 10.
Common USB Headset issues on Windows 10 –
- Headset Audio not working
If case your headset is not working, a third-party application may be the issue. You can fix this issue by getting rid of this application from your computer/laptop.
- Headset not working on Windows 7, 8, 10, on Skype
This particular issue can appear irrespective of the version of Windows. In case you come across such a problem, you will be able to resolve it using the solutions mentioned here.
- Headset Mic not working
At times, there can be an issue with the microphone of your USB headset. You can fix the issue; all you need to change the settings of your microphone.
- USB Headset not working
If you are not able to use your USB headset, try to reinstall your USB drivers. Once the drivers are installed, check if the issue is still there.
- USB not detected
At times, you may have to face a situation where your headset will not be detected at all. You can easily fix this issue by reinstalling your USB headset.
- USB Headset noise issue
This is one of the common issues found in the headsets. To fix the issue, you need to disable your headset and enable it again temporarily.
Here is the rundown of helpful troubleshooting tips you can consider to fix your USB headset issues.
Tip #1 – Unplug Your Headset While Windows 10 Reboots
You may have to face some conflict between your USB headset and other USB devices. Well, to fix this particular issue, you need to unplug your headset while your Windows starts. When your Windows boots, you can plug in your headset, and this should resolve the issue.
Tip #2 – Update Your BIOS and Reset CMOS
If you face the issue of distorted sound, you can reset CMOS and update BIOS. Updating your BIOS is one of the advanced processes, that said it might vary according to different motherboards. If you don’t have the expertise to do it on your own and you don’t want to harm your system, you can hire the professional services of driver restore.
Tip #3 – Avoid Using Your Headset as Default Playback Device
If your headset has a built-in sound card and gets easily connected with both audio and the USB port of your computer/laptop, then this tip will certainly prove handy.
One of the key issues you will come across, with such headsets, is that you will hear sound from only one speaker. To fix this issue, follow the below-mentioned points –
- First, you need to hit the icon of Sound (you will find this in the Taskbar). Once you have done this, go to the Menu to open the Sound settings.
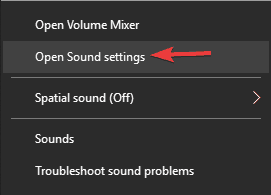
- Now, you need to make a selection for the Sound control panel.

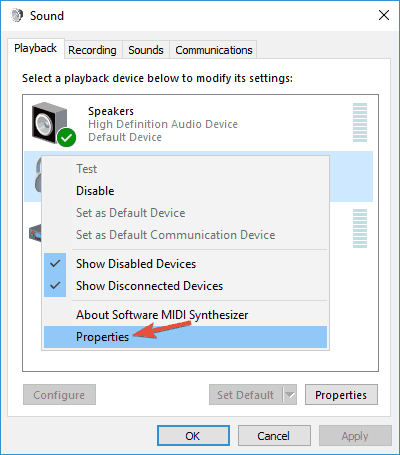
- At this stage, you will have the sound window right in front of you. You will have to make a right-selection on your headsets and make a selection for the Properties from the menu.
- Below Jack Information, you will see Device Usage. This is where you need to set Device Usage to Don’t use this device (disable). Once you have made the selection, hit Apply, followed by Ok to save the new changes.
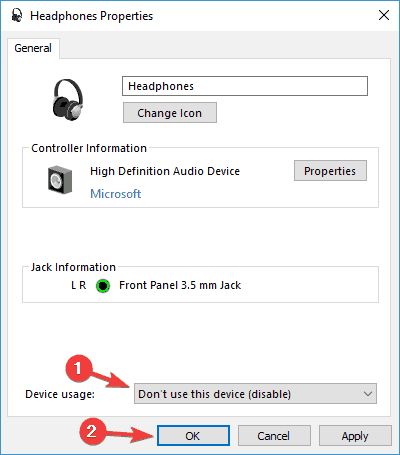
This step will make the sound card to process your audio instead of the built-in card in your headset.
Tip #4 – Get Rid of Tricky Applications
If you have third-party applications installed in your system, they tend to install their drivers, leading to different headset issues. To fix this issue, all you need to remove the applications that are causing issues in your system.
Time and again, users have complained that they have to confront these issues owing to different software. And to get rid of this issue, they have to uninstall all such software.
With the help of the Settings app, you can easily remove such applications. However, this step is not always effective as most of the times; it leaves residual files that can prove problematic for your USB headset.
If you want to fix this issue, you can take the help of an uninstaller software. This is a special software, and it is made in a manner that they not only remove all problematic applications from your computer/laptop but also its files and other register entries.
Using an uninstalled software, you will be able to remove all the files and registry entries related to the problematic application; this will also help you to prevent such issues in the future. You can choose from a plethora of uninstaller applications out there. Once you get rid of the application, you will be able to resolve the issue permanently.
Tip #5 – Uninstall USB Drivers
USB drivers can also be one of the key reasons behind the headset issues. Users, across the globe, have found issues with USB 3 drivers; however, reinstalling the drivers did resolve the issue. You need to follow the below mentioned steps to resolve the issue –
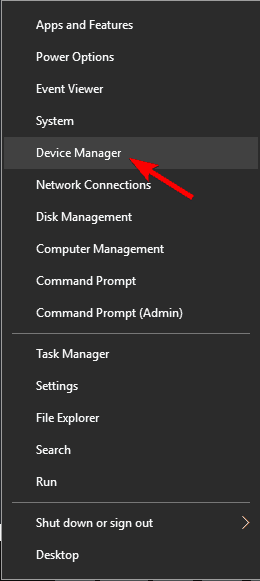
- Hit the key of Windows Key along with X; this will open Win + X menu. You will have a list of options in front of you, you need to select the option of Device Manager.
- When you open the Device Manager, you need to find a USB 3 driver. When you have found the driver, right-click on it and make a selection for Uninstall Device.
- At this stage, you will have a confirmation dialog box in front of you. You have to hit uninstall option from the menu.
- When you have uninstalled the driver, you need to hit the icon of Scan for hardware changes.
![]()
Windows will look for the default server and will carry out the process of installation. When the installation is done, check if this helped in resolving the issue.
If you are wondering whether this works for USB 2 and USB 3 drivers, then you will be glad to know that this works for both the drivers. So, you have the advantage of using it irrespective of the USB type you are using.
You will not face any issue with the default drivers; however, it is a wise decision to have a dedicated driver. You can easily find apt drivers from the official website of your motherboard manufacturer, or you can also do it with Driver Restore. Visit the website, mention the model of the motherboard, and download the latest drivers without any glitch.
If you are finding the whole process of finding the drivers manually arduous, you can also take the help of various tools which will download the required drivers.
Tip #6 – Disable Your USB Headset Provisionally
At times there can be an issue with your system, and this can lead to various headset issues. You can easily fix this issue; to fix this issue, you can temporarily disable your headset. For this, you need to do the following –
- The first step involves opening the Device Manager.
- When you open the Device Manager, you need to find your headset. Now, right-click on it and choose for Disable Device from the menu.
- Right-click on your headset and make a selection for Enable Device.
When you have done this, you have successfully resolved your USB headset issue. Remember one thing, i.e. this is merely a workaround and you will have to repeat it in case you encounter the issue once again.
Tip #7 – Disconnect the Headset and Turn Off Razer Synapse Software
Headset issues may also be a result of software like Razer software. To fix this issue, you need to unplug your headset and close the Razer Synapse. After a couple of minutes, reconnect the headset and also restart Razer Synapse software.
Remember, this is just a workaround, and you will have to repeat it in case you encounter the issue once again.
Tip # 8 – Check Your Privacy Settings
Privacy Settings can also be the reason owing to which USB headset issues can occur. Some users complained that some apps were not granted permission to use the microphone on their USB headset owing to certain settings. To fix this issue, follow the below mentioned steps –
- First and foremost, you need to open the Settings app. To do this, press the Windows Key and I simultaneously.
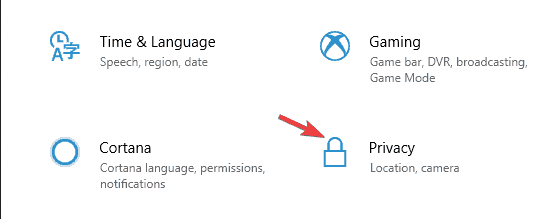
- In the Privacy Section, you will see four options –Time & Language, Gaming, Cortana, and Privacy. You need to hit the Privacy option.
Towards the left pane, you need to opt for the Microphone. Moving to the right side, you have to ensure that you have enabled Allow apps to access your microphone. Besides, make sure you check the list below and grant the permission for each application to access your microphone.
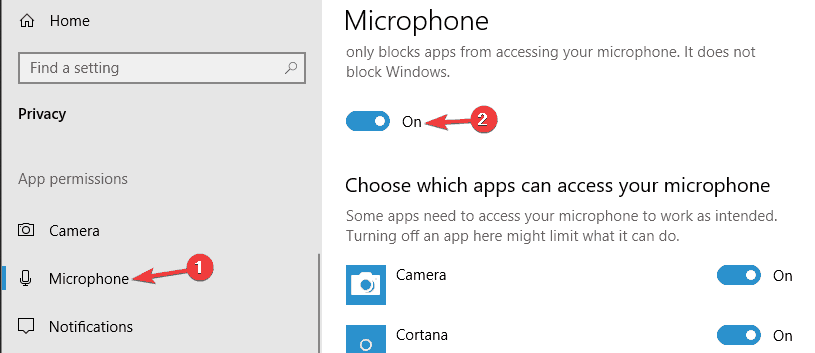
Now enable your USB headset. After enabling it, the issue should be resolved.
Tip #9 – Uninstall Old Drivers of USB Headset
Many people have also complained about USB headset issues after buying a new headset. They are of the view that the issue was the result of the drivers from a USB headset owned by them in the past.
To fix this issue, it is important to remove the old drivers as it may intervene with the new headset. To do this, follow the below mentioned steps –
- First, open the Device Manager.
- Now, hit the View tab and select Show Hidden Files
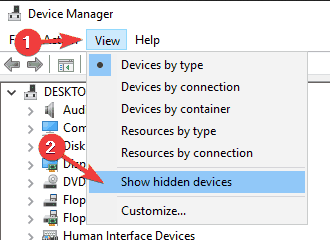
- Find your USB headset driver.
- Right-click on it and make a selection for Uninstall Device.
- In case it is there, you need to check Remove driver software for this device.
- Finally, hit Uninstall.
When you have removed the old driver, the issue related to your USB Headset should be resolved.
Hope the tips mentioned above have helped you in fixing USB headset issues in windows 10.