How To Fix/Disable Driver Signature Enforcement Windows 10

The issue of driver signature enforcement in Windows 10 has emerged as one of the common problems in Windows OS. If you are worried stick about the same problem then you are not the only one. This article will enlighten you about everything that needs to know about How to Disable Driver Signature Enforcement on Windows 10 PC, Disable driver signature enforcement permanently in Windows 10.
Contents –
What are Digitally Signed Drivers
These are digitally signed drivers from its respective vendors. The signature ensures the reliability of the driver and checksum to ensure that the driver file is not a modified one except what the signing authority has done.
The issue “Windows requires a digitally signed driver” will arise when the driver, you are installing, is not having a digital signature and it gets blocked by Windows. \ & it shows message for example Windows 10: Disable Signed Driver Enforcement
Also Read – How To Install Unsigned Drivers In Windows 10 [FIXED]
What is Windows Driver Signature Enforcement
When you install drivers in your computer (from varied manufacturers or a third party download software), it is not mandatory that all the drivers will have smooth functioning.
The functioning driver must have a digital signature. This digital signature, on the driver, will act as a digital security mark that will have publisher’s name along with all the details in case any change has been made to the original contents of the driver package.
It is essential that Microsoft has verified the drivers and the system files. Windows will not authorize unsigned drivers for both 32-bit or 64-bit system. This is the driver signature enforcement.
Keeping in mind the security aspect, Windows has initiated driver signature enforcement in Windows OS including Windows 10. Talking about this restricted feature, there are some restraints when it comes to driver signing especially in Windows 10.
In case the driver is not signed or authenticated, Windows will send you an alert such as –
· Windows cannot install the driver
· Windows cannot verify the publisher of the driver
· This driver has been changed
Let us now discuss the methods you can use to solve this issue.
What are the methods to fix Driver Signature Issue on Windows 10
Method A – Test Mode
Windows 10 comes equipped with Test Mode feature which is also known as Test Signing Mode. This particular feature empowers the developers to test the programs aptly.
· Step A – You need to open Command Prompt as administrator
· Step B – Or you can also run Test Mode from PowerShell. For this, you need to hit Win + x, followed by selecting Windows Powershell from the power user menu.
· Step C- Now, type command bcdedit-set TESTSIGNING ON and then hit enter.

Method B – Turn off Secure Boot
You are not permitted to turn off secure boot in Windows 10. So, for this, you will have to enter BIOS mode.
· Step A – You need to go to the Settings then Update & Security
· Step B – You need to choose Recovery then Restart
· Step C – Hit Troubleshoot, then Advanced Options, then Select UEFI Firmware Settings

Step D – Restart and then enter BIOS setup interface
Step E – You need to go to Security and turn off the Secure Boot
Once you are done, make sure you restart your PC/laptop. Now, you need to follow these steps to disable the driver signature enforcement.
Step F – Open the command prompt (admin)
Step G – You need to type the command bcdedit.exe/set nointegritychecks and hit Enter.

Method C – Advanced Boot Option
Wants to know, how to disable driver signature enforcement on windows 10 using advanced boot option? In case you want to shut down the driver signature enforcement on Windows 10, follow the below-mentioned method –
Step A – For this, you need to shut down your PC/laptop. Now press and hold down the Shift Key along and restart.
Step B – Hit Troubleshoot option.
Step C – Now you can choose Advanced Options

Step D – Go to the Start Up settings and hit restart

Step E – Hit F7 to disable signature enforcement

Step F – Restart your PC/laptop
Also Read – Background Intelligent Transfer Service (BITS) Windows 10 Problem [FIXED]
How to Disable Driver Signature Enforcement
You can facilitate driver signature enforcement as per your convenience. Go ahead and try the below-discussed methods. Both these methods involve typing commands in the Command Prompt window.
· Method A – If you have disabled driver signature verification using Troubleshoot, then you need to type following commands –
bcdedit.exe-set loadoptions DDISABLE INTEGRITY CHECKS

Now, restart your PC/laptop.
· Method B- If you have turned off the driver signature verification using the 2nd method, you can try out the below-mentioned command –
bcdedit/set testsigning off
Now, restart your PC/laptop.
How to Disable Signed Drivers Windows 10
With the help of digitally signed drivers, Windows 10 can achieve maximum security. Although disable driver signature enforcement permanently in Windows 10 is somewhat tricky, but it could get done if you follow the right steps to do it. When it comes to safety, this is indeed a handy feature. However, at times, you are looking to install drivers that aren’t signed, so here are the steps you need to follow to do that.
Steps to Disable Signed Drivers
Make changes to startup setting
Disable signing of the driver
Put Windows in Test Mode
Disable driver signature enforcement permanently.
If your Windows version is 64-bit, it is important you have installed digitally signed drivers.
If you opt for digitally signed drivers, then you can rest assured that no changes have been made since it was created and the hardware manufacturer created it.
With the help of driver signature enforcement, you have the assurance that the drivers are genuine and no changes are being made by the dangerous third party. This is, indeed, commendable if you are looking for the best protection for your computer/laptop. That said, alas, you will find only a few makers of digitally signed drivers, and this can be the reason behind numerous issues.
This becomes a issue, how to stop driver signature enforcement on a Windows 10 PC? If your drivers aren’t digitally signed, then you will find it hard to install them. Now, this will mean that you won’t be able to use associated hardware as well.
This is a major issue; however, disabling driver signature enforcement can be quickly done using the following discussed methods –
Solution 1 – Make changes to startup settings
This is the simplest way you can use to disable driver signature enforcement on Windows 10. That said, if you use this method, it will only disable the driver temporarily.
Driver signature enforcement gets turned on its own the moment you restart your computer/laptop.
Follow the below-discussed steps to disable the driver signature enforcement –
You need to press and hold the Shift key simultaneously and hit the button of Restart.

Select Troubleshoot, then Advanced Options, then Startup Settings, and finally hit the button of Restart
When your computer/laptop restarts, you will have a list of options in front of you. Now, you need to press F7; this will help you to select Disable Driver Signature Enforcement
At this stage, your computer will restart, and you can install unsigned drivers easily
Remember, these steps will disable driver signature enforcement temporarily. Therefore, you will have to install the unsigned drivers as soon as you possibly can.
Solution 2 – Disable Signing of Driver
As a solution, you can make use of the Local Group Policy Editor. You will have to be extra cautious while using this editor, make sure you don’t modify anything else.
If you are looking to disable the driver signing code, follow the below-discussed steps –
Open Local Policy Group Editor: you need to press Win along with R
You will have a run box in front you, here you will have to type gpedit.msc.

In Local Group Policy Editor, hit User Configuration
From the main window, you need to double-click on Administrative Templates
A menu will open, and you will have to double-click on System. Then go to the Driver Installation
Make a selection for Code Signing for device drivers entry
Make a selection for Enabled and from the drop down, change to Ignore
At this stage, hit Ok and apply the changes you have made
Now finally, restart your Windows 10
Also read – How to Fix Mouse Cursor Disappears in Windows 10?
Solution 3 – Put Windows in Test Mode
If you are not looking to disable driver signing permanently, in that case, you can enter Windows 10 test mode.
When you are in the test mode, you can install any driver you want. After you have resolved the issue, make sure you go back to the normal Windows 10 mode –
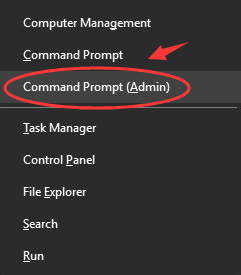
In the first stage, you need to open an elevated command prompt window on your computer/laptop: make a right-click on the Windows Start icon, and you need to make a selection for Command Prompt (Admin).
In the command window, you need to type – bcdedit /set TESTSIGNING OFF
Now, close the command window and restart your computer/laptop
At this stage, install your drivers
You will have to revert back to the normal mode: open elevated command, you need to enter
bcdedit /set TESTSIGNING ON followed by restarting your Windows 10 system
Solution 4 – Disable Driver Signature Enforcement Permanently
The above-discussed solution will only disable driver signature enforcement will only last for a short while. However, to disable it permanently, follow the below-discussed steps –
First, you need to press Windows Key along with X simultaneously. This will open the Power User Menu. Now, you need to make a selection for Command Prompt (Admin) from the menu

When the Command Prompt is open, you need to enter
bcdedit.exe /set nointegritychecks on and hit Enter

If you want to enable driver signature enforcement once again, open the Command Prompt as administrator, and you need to enter
bcdedit.exe /set nointegritychecks off. (Optional)

Alternatively, if you are looking to disable signature enforcement, you can use the following discussed methods –
First, you need to start the Command Prompt as administrator.
As and when the Command Prompt starts, you need to enter the following lines
bcdedit.exe -set loadoptions
DISABLE_INTEGRITY_CHECKS

bcdedit.exe -set TESTSIGNING ON
At this stage, you need to close the command prompt. You need to restart your computer/laptop
Open the Command Prompt as administrator and enter
bcdedit -set loadoptions ENABLE_INTEGRITY_CHECKS
This will enable the driver signature enforcement.

bcdedit -set TESTSIGNING OFF

Remember, if you use this solution, this will disable driver signature enforcement permanently. One disadvantage of this solution is that it will make your computer vulnerable.
Also Read – List of Windows 10 Blue Screen Error & Stop Codes (BSoD)
What Should You Do to Make All Drivers Work Properly on Your Laptop, Notebook or Desktop PC
Now you know how to disable driver signature enforcement on Windows 10 easily! At times, it can be an arduous task to find the exact drivers for your device or hardware. In case you install a wrong driver, it can even crash your PC/laptop. Therefore, it is essential that you download the right drivers for your PC/laptop. You can download and install drivers from FixBit, driver update software for smooth PC performance
Rest assured, you will enjoy easy download and install best-matched drivers for your system compatible with Windows 10.